Did you know that you don’t have to take pictures to add your clothes to Stylebook? Stylebook has a clipper tool that allows you to instantly add images from store websites you choose. You can access this in the Shop feature! You can also paste from your computer with universal clipboard.
Below are instructions for all four methods and photo tips that will help you get the best photos for Stylebook. We recommend that you start by photographing your favorite in-season items so you can start getting the benefits from Stylebook right away!

Method 1 – How To Take The Ideal Photo
Before you start importing pictures, read these easy photo tips to make sure you’ll get the best photos for your digital closet.
- Bright Light – Take your photo in the brightest light possible (preferably natural light), but avoid getting dark shadows in your photo. Sunlight will give you the most accurate colors.
- Background – Photograph your clothes on a smooth, solid-color background that’s a completely different color than the clothing. (Sheets fresh out the dryer, the back of a flat door or bulletin board paper work great!) The background color should make the clothing stand out. Don’t use carpet, fleece, wooden floors, the back of a paneled door or any other textured surface.
- Background Color – You can use any color as long as it’s a completely different color from the clothing you’re photographing. If you’re taking a photo of patterned clothes, avoid using any of the colors that are in the pattern. We recommend a dark background for light clothes and vice versa. Get more tips on backgrounds here!

- Framing – Smooth out your background neatly and avoid getting anything but the sheet and clothing in the picture. You don’t want to see the surrounding floor, clutter, dark shadows or feet in the picture.
- Focus – Wipe off your phone’s camera lens with a soft cloth and make sure your photo is in focus. Here are a few more camera tricks and tips!
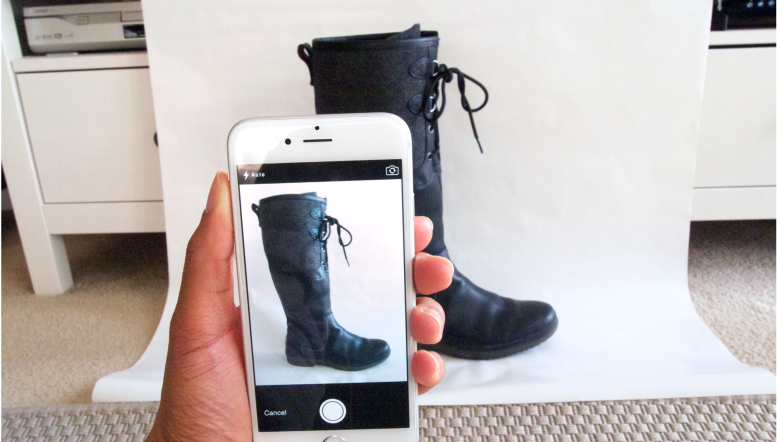
Take A Photo with the iPhone or iPad Camera
- Tap “+” on the home screen or category page
- Select “Add Clothing” from pop-up menu
- Select “Take Photo” and photograph your clothes using the photo tips below.

Camera Import: 1. Tap “+” , 2. Select “Add Clothing”, 3. Select “Take Photo”, 4. Photograph Clothes

Method 2 – Import Photos from the Camera Roll
- Tap “+” on the home screen or category page
- Select “Add Clothing” from pop-up menu
- Select “Choose from Album”
- Tap the image you’d like to add from the grid of thumbnails.
Tap the “Choose from Album” button to add photos from your Camera Roll
This is also a great way to add photos from a digital camera. Just import your camera photos to your Photos app before you start. Don’t forget to use our photo tips for the best results (see below)!
Method 3 – Add Photos from Shopping
- Open the Clipper tool in the Shop feature and enter any website into the URL box
- Open the image you want to save. We recommend clicking through to the largest view to get a high-quality image.
- Once the screen has fully loaded “+Clip” will be available. Tap “+Clip” on the top right.
- Tap your image to select it to see a full screen preview. If more than one image is available, you’ll be able to swipe through the full screen images.
- Tap “Import” on the top right to add to your closet or inspirations
- Use the background removal tools to edit the image.
- Save your images

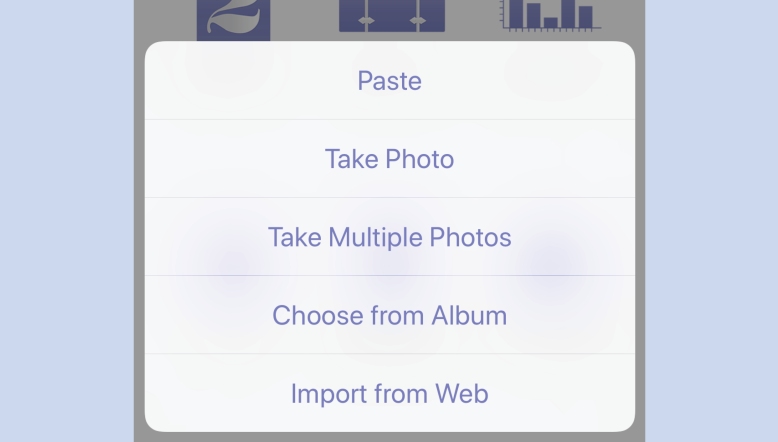
Method 4 – Copy & Paste from Online
- Open a blog post in Safari
- Hold your finger over the image you’d like to save
- Select “Copy” from the pop-up menu
- Open Stylebook
- Open the clothing or inspiration category where you’d like to save the image.
- Tap ” + Item” in the top right.
- Select “Paste”

Tap and hold you finger over an image in safari to see this menu
Copying and pasting can be tricky because some blogs only allow you to copy the link, not the photo itself. You’ll notice this if you attempt to paste and you get a message saying the clipboard is empty or if an older image is pasted instead. Occasionally, you can work around this by opening the image to it’s full size by clicking it again. If that still doesn’t work, you can save the photo to your camera roll with the instructions below.
Save a Photo from Safari Without Copy and Paste
- Open the blog post in Safari
- Hold your finger over the image you’d like to save
- Select “Save Image” from the pop-up menu
- Open Stylebook
- Open the clothing or inspiration category where you’d like to save the image.
- Tap ” + Item” in the top right.
- Select “Choose Existing”
- Select the saved blog image from your Camera Roll

Stylebook Note:
When you add an item to the closet, looks or inspirations, it will appear as the second icon in the top row of the grid for that category. This is because the first icon is reflected as the category icon on the category screen. To customize your category icon, press Edit on the thumbnail grid screen and drag your desired thumbnail to the first spot on the grid (upper left).
Getting Started Tip: You can use the Multiple Import feature to add items one after the other when you’re getting started. Here is a tutorial!
The Do’s and Don’ts of Taking Closet Photos

Here’s an explanation of why the first photo is right but the other two won’t work.
Photo 1: Correct
- Bright, even lighting
- The background is a different color from black and white top (It doesn’t have to be yellow! In this case, anything but black and white would work – like red, green, pink, etc.)
- The background covers the entire frame. No edges are showing
- Shirt and background are neatly arranged
Photo 2: Wrong
- Textured carpet used as background. Always use a smooth background, like a sheet.
- The lighting is very dim and it’s difficult to see the shirt. Take your pictures in daylight instead, adjust the exposure or use the flash instead.
- The shirt has been thrown on the floor, but it should be laid out neatly.
- The edge of a rug and the photographer’s foot are in the photo but only the background should be visible.
Photo 3: Wrong
- The cream background is a similar color to the white stripes in the shirt
- The background doesn’t fill the frame and the top right corner shows clutter.
- Lighting is too dim

LOVE your app! I’ve taken great photos using your tips (yay, tissue paper!). The process is a bit hard on the back & knees. I have a dress form, what can you say about using that for photos? I’d cover exposed areas and background in contrasting fabric. Hoping it would be easier and provide better draping for images. Thanks!!
LikeLike
Hmm we haven’t used a dress form before but that is an excellent idea! I’d say follow the same background and lighting tips you would use while photographing clothes on the floor. You could hang your sheet up on the wall behind the dress form. We’d love to hear about how this turns out!
LikeLike
Unfortunately, Stylebook is only available for the iPhone and iPad. We don’t offer an Android version at the moment, so I’m not sure what app you’re using.
LikeLike
Is there a possibility to’turn’the pictures so that the overal look is not so rigid?
LikeLike
Not at the moment, but thanks for the suggestion!
LikeLike